Table of Contents |
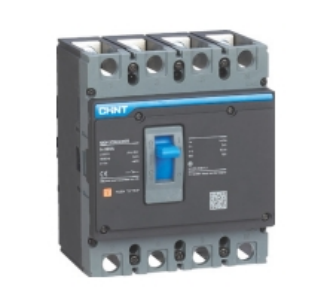
NXM molded case circuit breaker is a popular device. It’s common in commercial and industrial settings for protecting electrical circuits. It works by automatically opening a circuit when it detects abnormal current flow. Examples include overload or short circuit. Proper installation of this molded case circuit breaker is important. It helps ensure safety and efficiency.
Preparation Before Installation
Before beginning installation, careful preparations must be made to ensure safety. Here are the key recommendations:
1. Safety Precautions
Disconnect power. Then, de-energize the electrical system. Wear insulated gloves. They protect against electrical current. Use safety goggles, too. They prevent potential injuries from sparks or accidental contact.
2. Tools Required
Gather all necessary tools before the installation of the NXM molded case circuit breaker. Here’s what’s required:
- Wires of the appropriate specification
- A high-power electric screwdriver
- An M10 Allen key
- A standard wrench
- Needle-nose pliers
- An electric screwdriver
- Insulated gloves
Having these tools ready will streamline the installation process and help you work efficiently.
3. Ensure a Safe Environment
The installation environment must be checked to ensure safety. There should be no flammable or corrosive gases present near the installation area. These pose serious hazards. Conditions should also be dry. It’s because moisture or water can lead to short circuits or equipment damage.
Pre-Installation Checks
Thorough pre-installation checks are essential to prevent potential complications during and after the installation process. The following are some top recommendations:
1. Read the Instruction Manual
The instruction manual contains vital information for proper molded case circuit breaker installation. They should be thoroughly reviewed and understood before proceeding with any steps. Pay close attention to specifications, requirements, guidelines, and recommendations for the NXM series.
2. Verify the Installation Environment
Carefully confirm that the installation location meets all specifications. Consider the specs regarding space, wall characteristics, ambient conditions, and other environmental factors. Also, make sure the location where the MCCB circuit breaker will be installed is powered off.
3. Inspect the Circuit Breaker for Damage or Missing Accessories
Give the CHINT circuit breaker a thorough visual examination inside and out for defects, cracks, and dents. Also, check any missing internal components that may have come loose during shipping. Check that standard accessories like mounting screws are accounted for.
4. Confirm the Product Model Matches the Order
Double-check that the model number on the molded case circuit breaker matches what was ordered and is suitable for the job. This cross-validation provides assurance.
Installation Process
How to install a circuit breaker? This process requires precision, technical knowledge, and careful execution. Each step must be performed methodically. Follow these guidelines:
Step 1: Fix the Circuit Breaker to the Distribution Board
Refer to the installation dimensions provided in the instruction manual. Select appropriate screws and nuts based on the specific frame type of the molded case circuit breaker. Ensure you follow the manufacturer’s recommended mounting specifications and torque requirements.
Step 2: Wire the Circuit Breaker
Connect power and load lines carefully. Adhere to electrical standards for 2P, 3P, or 4P configurations. Make sure all connections are secure and meet the specified wiring torque of 30 N.m.
Testing and Final Steps
At this stage, the circuit breaker installation is nearly complete. However, a few important final checks and tests must be performed to ensure everything is functioning properly:
1. Insert the Arc Barrier into the Mounting Slot
The arc barrier is a vital component that helps suppress arcs and flashovers. Make sure it’s securely inserted into its designated mounting point. This point is inside the circuit breaker housing. You can refer to the instruction manual for a visual cue.
2. Test the Basic Functions
Test each function individually by following this sequence:
- First, reset the circuit breaker by pushing the RESET button.
- Then close the circuit by pushing the ON button.
- Subsequently, open the circuit by activating the OFF button.
- Finally, induce a TRIP condition by overloading the circuit. This is to verify that the auto-trip mechanism operates as designed. Record and note any abnormalities.
3. Check All Connections for Security and Compliance
Give all wire connections and terminal screws one final torque check according to specifications. Do this while observing polarity and phase identification markings. Also, confirm the installation complies with relevant electrical codes for the location through visual inspection. Check for potential hazards such as loose fasteners. Tighten any connections as needed.
For a more direct look into the installation process of the NXM Molded Case Circuit Breaker, check out our YouTube video:
Conclusion
Proper installation of an NXM molded case circuit breaker is key to protecting electrical systems safely and reliably. Consulting professionals from CHINT can help with any installation challenges. CHINT is a premier brand known for global leading smart energy solutions. With over years of experience, the circuit breaker manufacturer offers a full range of circuit protection solutions to suit diverse needs. Visit our website to learn more about NXM circuit breaker and explore our additional offerings.


